The Turnkey Live View enables you to design the web UI while your app is running. It makes changes to the different interfaces of the application through the different ViewModels and allows you to view the results of the changes in real time. It is useful for designing and testing the app's UI responsiveness and testing UI concepts.
The Turnkey Live View is accessible through the Turnkey Live View Editor button. It is an embedded browser within the designer for editing the UI.
NOTE: The Turnkey application has to be running in order to use the Turnkey Live View.
Turnkey Live View Features:
- Server Setup
- Live Edit
- AssetsTK Synk
- Debug Information
Server Setup
The Server Setup section starts the Turnkey application. You can either use the local Turnkey prototyper (default) or use the MDriven Server setting to start the app.
Live Edit
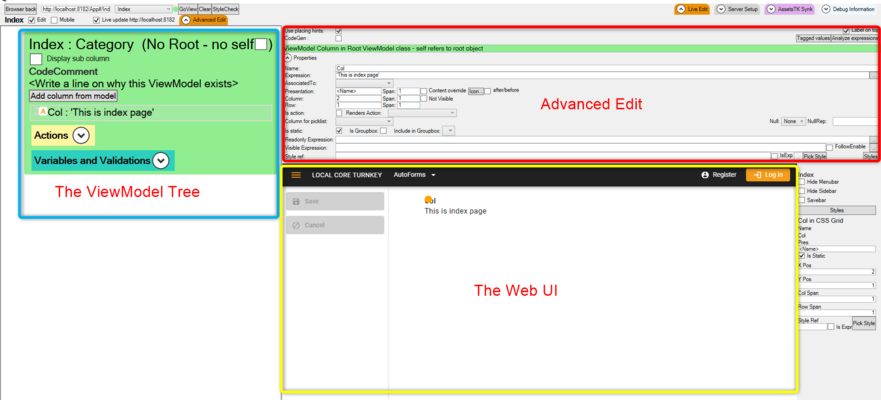
The Live Edit section is where the actual fine tuning of the UI is done in real time, either from the ViewModel tree or the the actual generated UI.
For editing and designing, Live Edit has three sections:
- The ViewModel tree
- The Web UI
- Advanced Edit
The ViewModel tree
The ViewModel tree provides access to the ViewModel Editor interface of a ViewModel. It provides all the options and settings of the ViewModel Editor such as adding and rearranging columns, adding nestings, placing containers and more.
Advanced Edit
The Advanced Edit section is for ViewModel and ViewModel column properties settings and constraint settings. This is also another feature adopted from the ViewModel Editor.
The Web UI
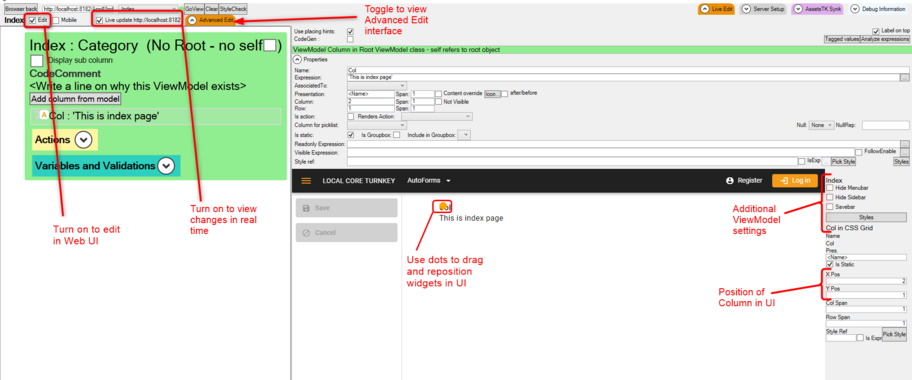
This section shows you the UI as it will be seen by users. Direct editing is available in this section for dragging and repositioning UI widgets:
- Turn on Edit to edit in Web UI
- Turning on the Live Update feature enables you to view ViewModel changes in real time.
AssetsTK Synk
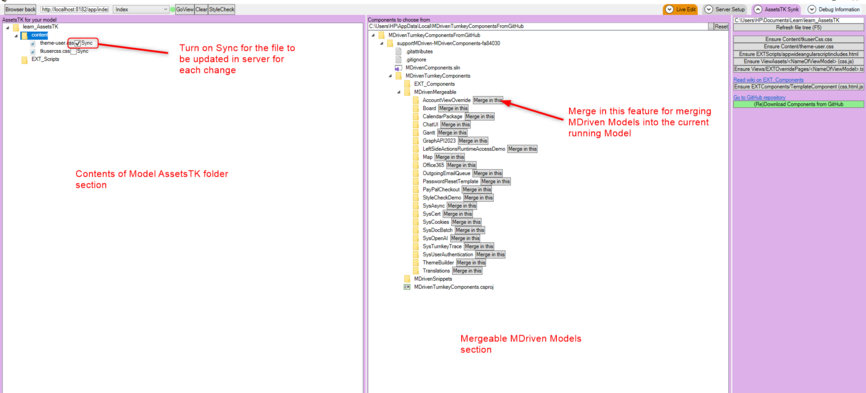
This section of the AssetsTK folder shows configurations for the current running Model. When this section is expanded, the AssetsTK folder is automatically created if it does not exist.
This section provides options to create asset files for customizing the Turnkey application UI and merging models into the current running Model.
The AssetsTK Synk features:
- Refresh file tree: This is for refreshing the AssetsTK file tree to view all content currently in the folder.
- Ensure Content/tkuserCss.css: Creates the tkusercss file for creating personalized CSS that can be merged into the Turnkey applications
- Ensure Content/theme-user.css: Creates the theme-user css file for editing the default Turnkey theme properties.
- Ensure EXTScripts/appwideangularscriptincludes.html: Create the AppWideAngularScriptIncludes html file for loading scripts in the page rendering.
- Ensure ViewAssets/<NameOfViewModel> (css.js): Creates ViewModel CSS and JS files for overriding the UI.
- Ensure Views/EXTOverridePages/<NameOfViewModel>.tagexpander.cshtml: Creates the current ViewModel tageexpander file for overriding the default Turnkey UI implementation.
- Ensure EXTComponents/TemplateComponent (css,html,js): Creates the folder and files structure for creating an Angular component to integrate in the Turnkey application.
- (Re)Download Components from GitHub: Downloads the latest mergeable models onto your local machine.
- Components to choose from: This section provides MDriven models available for merging into the current model. These include examples and patterns for integrating other MDriven functionality into the app. First Download Components from GitHub before using this feature.
Debug Information
The Debugger UI provides access to the model using the Server Setup settings used to start the Turnkey application. This section adopts all the functionality of the Model debugger to check for errors, creating, reading and updating Model data including testing ViewModels.
Watch this video to learn more


